
John Frost Bridge carries traffic over the Nederrijn at Arnhem. It looks much like the bridge that stood here in September 1944, but it is not the same one. The houses around its north ramp have gone as well, replaced by post-war blocks, a ring road and grass. To see the ground the paratroopers held, you have to rebuild it. I have done that in a 3D model of the Arnhem road bridge, which you can turn and zoom in your browser.
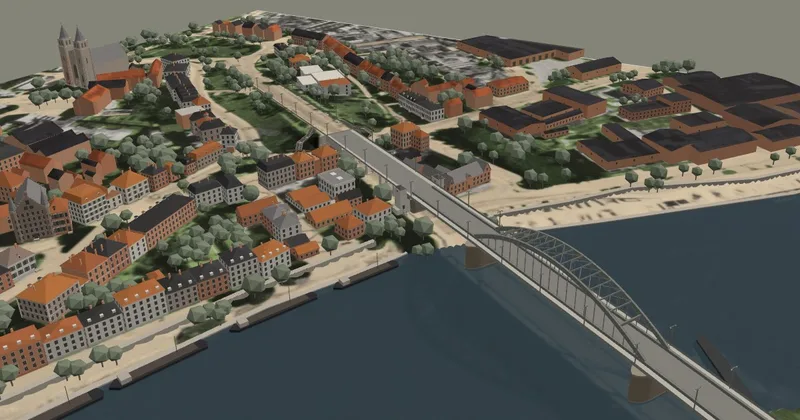
Built on a reconnaissance photo
The model starts from one photograph. On 12 September 1944 an RAF reconnaissance aircraft took a vertical photo of Arnhem and the river. The print is held by the Nationaal Archief in The Hague. It shows the bridge, the ramp, the streets and the back gardens five days before the landings.
I used that photo as the ground and built on top of it. The bridge comes from its monument description and from period and present-day photos. The houses near the ramp come from wartime photos and postcards. Buildings further away are simplified, and many heights are estimates. The model is a work in progress, and I keep refining it as I find new sources.
The ground Frost held
On 17 September the 1st Airborne Division landed on heathland and farmland more than ten kilometres west of the bridge. Lieutenant-Colonel John Frost’s 2nd Parachute Battalion took the lower road along the river and reached the north end of the bridge around 20:00. With brigade headquarters, engineers, an anti-tank troop and smaller attached units, he had some 740 men. They took over the houses on both sides of the ramp. The other two battalions of the 1st Parachute Brigade were stopped in the western outskirts of the town and never got through.
That night Lieutenant John Grayburn led No. 2 Platoon of A Company onto the bridge to take the southern end. Two 20 mm guns and an armoured car opened fire on them from the far end. Grayburn was shot through the shoulder and kept going until his losses forced him back. The south end stayed in German hands.
On the morning of 18 September the reconnaissance battalion of the 9th SS Panzer Division, under SS-Hauptsturmführer Viktor Gräbner, drove north across the bridge with armoured cars, half-tracks and trucks. The first few vehicles got through. The rest were caught on the ramp by anti-tank guns, PIATs and small-arms fire from the houses. About half the column was knocked out, and Gräbner was killed.
Seen in the model, the reason is plain. The ramp runs high and straight between the houses, and a vehicle on it has nowhere to go. The bridge is part of my Arnhem tour, and the hardest thing to explain there is what is no longer standing. One of the set views in the model puts you in the tower of the Eusebiuskerk, a few hundred metres west of the ramp, looking down on the perimeter as a whole.
Grayburn’s platoon held a house overlooking the bridge until the Germans set it on fire on 19 September. He then gathered men from several units and kept fighting, wounded a second time. On 20 September he stood up in full view of a German tank to direct his men back to the main perimeter, and was killed that night. He was awarded the Victoria Cross posthumously. Frost was wounded the same day, and the last defenders were overrun or captured in the early hours of 21 September.
The bridge in the model no longer exists. On 7 October 1944 American B-26 Marauders bombed it so the Germans could not use it, and the span dropped into the river. The new bridge was built to the original plans and reopened in 1950, which is why it still looks like the one Frost’s men held. It has carried Frost’s name since 1978.